
Lightboxes don't have to be expensive! I made one from stuff I already had around the house.
Here's what mine looks like:
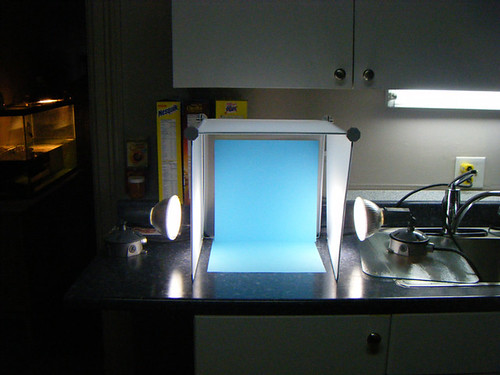
The lights were made my Drew (he's a whiz when it comes to lighting and electrical stuff). The frosted square is actually from a clothing storage unit we have. The unit came with 3 squares that connect and stack on each other. I just took the top part off to use it for my photography needs. I figured this was a lot easier than actually MAKING a real light box. The blue you see is just 2 sheets of 12x12 card stock. As you can imagine, I have a lot of card stock to choose from lol.

This set up worked really well. If you have bigger stuff it wouldn't work as well but you can easily make a lightbox that can handle your bigger items. All you need is a big cardboard box!
This lightbox was made for FREE using a cardboard box and some white paper. The person simply cut large squares in the side of the box and covered them with paper. Now they can set up lights light mine and shine them through the sides.

diy lightbox, originally uploaded by D'Arcy Norman.
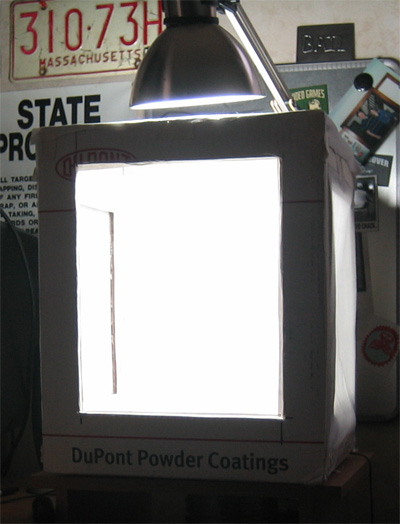
You can also cut out the top of the box and cover that with paper and use one light to shine down through the box like the lightbox below. This works really well! All you need is one light, one box, and a couple sheets of paper. You can see how bright the inside of the box is if you use a lamp like this one. If you noticed you still had a shadows you could shine lights through the sides of the box too.


Wow, thanks, this helps a great deal.
I have most of the mechanics already, and need to experiment.
Lisa
I might make one of these! Thank you for helping this newbie. :)